Did you know that you can insert, remove and/or modify shared
borders in FrontPage?
Shared borders are sections of the page (top, bottom, right,
left) that are used as containers to hold content that you want to appear on all
your pages such as your navigation menu. The instructions below apply to
FP 2003, but are similar in earlier versions.
Insert a Shared Border
-
Now this is a no-brainer . . . Go to File > Open Web and
click on the web that you want to work on.
-
Open the page where you want the shared border. You
can do this from Navigation view or Folders view.
-
Go to Format > Shared Borders. Shared borders in FP
2003 by default is turned off. 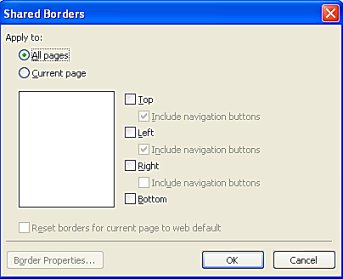 To turn it on go to Tools > Page
Options > Authoring > and select the Shared Borders check box, then click
OK.
To turn it on go to Tools > Page
Options > Authoring > and select the Shared Borders check box, then click
OK.
-
In the Shared borders dialog box, click on "All Pages" if
you want the borders on all the pages in your web, or Current page if you
only want the shared border on the open page.
-
Select the desired border(s): top, bottom, right, left, by
click to select the checkbox.
-
Click OK to close the Shared Borders dialog box.
Edit a Shared Border
To make changes to a shared border, you can open either the page
that uses the shared border or the file that contains the shared border you wish
to change. (Note: In Design (or Normal) view the
page appears to have a table layout. If you view the HTML code, you will
only see the code for your central page. The content for shared borders is
found in the borders folder.)
-
Follow steps 1 and 2 in "Insert a Shared Border".
-
Next, on your web page, click inside the shared border and
make the change(s) that you want. If this is the first change you've
made you will see the following notation:
Comment: This border appears in all pages in your Web.
Replace this comment with your own content.
Click on the Comment text and insert your change.
-
Then click File > Save > Close (if you're finished working
on that page).
To make a change to the "shared border" file, go to your Folder
list and look for the folder that reads _borders. To make changes directly
to the shared border file,
-
Expand the folder by clicking on the + sign.
Right-click on the border you want to change (Top.htm, Bottom, htm, Left.htm
or Right.htm) and click Open.
-
Then follow steps 2 and 3 above.
Remove a Shared Border
To remove shared borders,
-
Go to File > Open Web and in the Open Web dialog box and
click Open again.
-
Next go to Format > Shared Borders.
-
In the Shared Borders dialog box, in the Apply section,
Click either All pages or Current page; check or uncheck the appropriate
border boxes and then Click OK to close the Shared Borders box.
Back to Tutorials
Copyright 2002 - 2012
All Rights Reserved - Stormy
Not to be reproduced, published or transmitted electronically in any way without
express written permission.